Thursday, October 18, 2012

Tired of Yellow Paint

Being an Interior Designer has its downfalls. When I went to school, I was familiar with and liked a certain style and that was the style I grew up with in my home - TRADITIONAL. But, after taking classes in the History of Architecture and the History of Furniture and being introduced to a lot of other styles, I came to the point where I had an appreciation of so many different styles. Learning how to PATTERN MATCH also added to my frustration. I now can look at a fabric or paint color or piece of furniture and see it in any home-- including my own.

So...when we moved into our home and we chose all of the paint colors and filled it with our mainly traditional items, I thought I was set. Little did I know that it wouldn't take very long and I would want to change things up. Of course, anyone knows that changing paint colors and furnishings can be very expensive. In order to change things up a bit, you have to get really CREATIVE and FLEXIBLE.

The changes began when I decided that I was really tired of the YELLOW paint that spread from our entryway to our kitchen and throughout our living room and stairway. I wanted to break up the yellow just a bit. 

Living Room Change 1: Get inspiration from Candice Olson and paint wide STRIPES horizontally across one wall. I really wanted to do this on the fireplace wall, but that wall spreads across to the base of the staircase and I didn't want that area to be the main focus of our living room. So, I opted to paint the one long uninterrupted wall in our Living Room that is behind the TV. I love my perfect stripes and I have to give Kuddos to my perfect husband who used painters tape and a level to tape the stripes on the wall for me to paint. 


  •   Stripe option 1: Paint stripes in a completely different color (still coordinating); our walls were           yellow so I opted for a neutral cream in the same tint as the yellow so they looked good together
  •   Stripe option 2: Paint the wall one color and then paint the stripes in a different sheen, but the same color (this is what Candice did); For example: if the wall is a flat paint, paint the stripes in a glossy sheen. 
BEFORE: Living Room Wall in Painting Process  AFTER: I love the New Wall and the painting is a painting of my two dogs by me
                                        

Living Room Change 2: Paint the fireplace. After painting the stripes, I visited a friend's home and saw her fireplace. It was painted a dark color and it really gave it that old house look. I loved it and of course, wanted to do it in my own home. So, one day while my husband was at work, I tackled the fireplace.My first option of paint was to go to the Behr Historical Registry colors. I didn't find one there that I really liked so I went with Valdspar Blanched Thyme 4001-4A from Lowes. I remembered seeing photos of painted molding around fireplaces and it reminded me very much of a man's library or a room in an old farmhouse. I did some research on this and found that adding paint to these areas began as early as the 1700s. http://www.oldhousejournal.com/magazine/2003/dec/mantels.shtml 


My Fireplace Inspiration for Shelves in Space Planning-- my dream home is a Craftman Bungalow! Sigh!! 

hampton 015 hampton 014
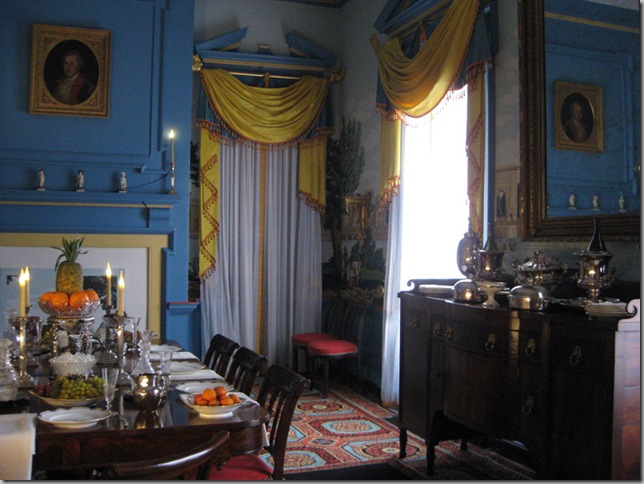
Hampton Mansion - take note of the all over blue walls that are also used on the fireplace. Thank you  http://pigtown-design.blogspot.com/ for the pictures. The picture on the right shows the painting of the molding as well. This is the look I was going for.


I did leave some of the details on the fireplace white and I am planning to go back and use the same neutral cream that was used on the horizontal wall on the adjacent wall. 
BEFORE: Fireplace Surround in White

Fireplace Mantle After 

Living Room Change 3: Space Planning- Inspiration Craftsman Style Living Room with fireplace and built ins. With the baby coming soon, I do realize that my home will not be my own to keep perfectly organized anymore-- but I will do my darndest to have it at organized as possible while still allowing baby the run of the house. Ha! But, that being said, there needed to be space for baby to play. While I have gone through several different plans on this, I think I have found a winner. The dresser redo project (see earlier post under DIY) was originally going to be used in the Living Room for baby's toys. It was perfect and had 6 drawers that could hold all types of things. After I refinished it, I decided to use it in the entryway instead. So, I needed to have another solution for the living room. I rearranged the furniture for the millionth time since we have been in our home and added a few case pieces for storage. The current entryway piece ($400.00 at a Pottery Barn Outlet) was an open piece with two shelves and two very skinny drawers - I am assuming since this was to be in an entryway or used as a buffet that the drawers were for linens and silver because not much else can fit there. I decided the open shelves and skinny drawers lend themselves perfectly to being used for toy storage. I moved the piece into the living room on one side of the fireplace- it fit perfectly and left an opening in front of the gas nozzle which was great. In the top two drawers, I stored items such as playing cards and later coloring books, crayons, paper, etc. On the bottom two shelves, I have stored games and smaller toys for baby. It works!!

I will be posting pictures at a later time and I will also be writing another post on how to have workable, beautiful storage in your living area that also makes it safe for baby. Stay tuned. 
Pictures are  now posted! Yay! Please read my next post on how the SPACE PLANNING is coming along. 

No comments: